Note 1: If you are using full-range speakers, this FAQ does not apply to your audio setup.
If you are using component speakers without a subwoofer, this FAQ does not apply to you.
If you are unsure if your speakers are full-range or not, please see this FAQ:
59672
Note 2: Before adjusting crossover frequency settings, please follow the instructions in
the manual for your audio system. Some audio systems prefer to be set to full-range because
the crossover filters in the receiver or subwoofer are designed to direct the audio frequency
appropriately without the need for an audio controller to first divert the frequency ranges.
For this reason, please read the instruction manual first for your audio system. If your audio
system should be set as a full-range speaker, then this FAQ does not apply to your system.
Most audio controllers allow the user to change the default crossover frequency in the audio
manager for that controller. However, the Realtek HD Audio Manager does not allow you to manually
set the crossover frequency for your audio system. Instead, the default frequency appears to be
set at 60Hz. For some audio systems, this may be too low or too high, requiring the user to change
the settings. Unfortunately, the only way to do so with the Realtek software is by bypassing the
software altogether and changing the frequency via a registry edit.
Every audio controller and audio speaker system uses crossover filters to properly direct frequencies
between speakers and subwoofers. Generally, low frequencies will be sent to the subwoofer, while
greater than 99% of the rest of the audible frequencies will be sent to your speakers. However,
there must be a point where the frequencies diverge so that the audio signals can be sent to the
proper output device: This is called the “crossover frequency.”
Properly setting the crossover frequency will help keep audio in the low frequencies
(often called the sub-bass) free from distortion, while ensuring you keep the higher frequencies
outputting from the speakers. For example, the Realtek default crossover frequency is 60Hz.
This means that any frequency lower than 60Hz will be directed toward the subwoofer, while any
frequency 60Hz or higher will be directed towards your speakers.
Depending on your audio system, the proper crossover frequency may be a different value than 60Hz.
If the crossover frequency is incorrect for your audio system, you may experience some distortion
around that frequency range or other audio anomalies that cannot be corrected. To remedy this, we
must change the crossover frequency for the Realtek HD Audio Manager.
Before you can change your frequency, you must first determine the proper crossover frequency.
To find the crossover frequency for your audio equipment, look at the specs for both your speakers
and subwoofer. Some pre-assembled speaker systems may tell you where to set the crossover frequency
in your instruction manual. If not, then look for the
minimum frequency response of your
speakers
(e.g. 75Hz, 80Hz, 175Hz, etc.), and the
maximum frequency response of your
subwoofer
(e.g. 60Hz, 80Hz, 120Hz) Once you have that information, you can set the crossover frequency.
First, open Windows RegEdit. In Windows 10, 8, and 7, left-click the start menu and immediately
type “regedit”; there are other ways to access the registry, but this is perhaps the easiest.
After typing “regedit”, you should see this option:

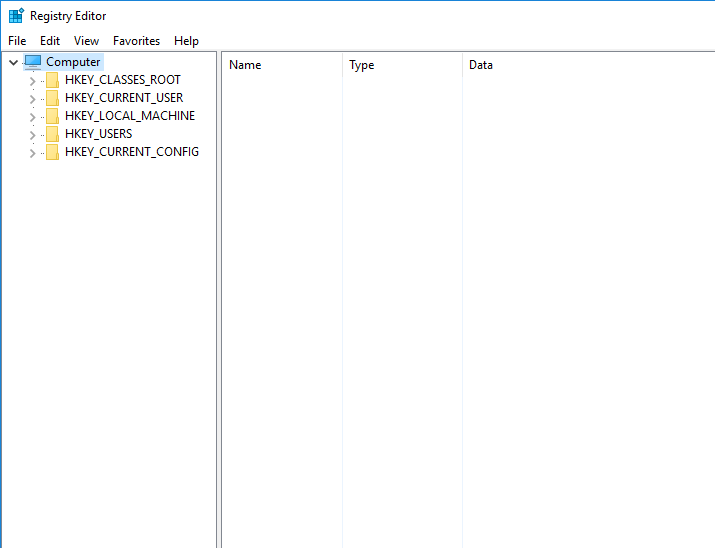
Click on this option to open the Windows Registry. RegEdit will generally open up to the last section
you viewed or made changes to, as well as show all hardware/software installed, so your RegEdit screen
may look somewhat different than this:
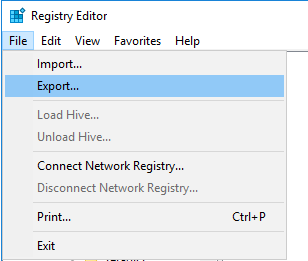
Before we make any changes to the registry, it is always advisable to backup your registry, in case
you make a mistake or Windows experiences issues after making changes. To backup the registry, click
on “File” at the top left, then click “Export”.
This will bring up a pop-up box and you can select a location to save your Registry. Make sure to name
it something you will remember, then click “Save”. If you ever need to reload the registry, you can go
back to the File menu and import the file, or you can simply double-click the registry file you just saved.
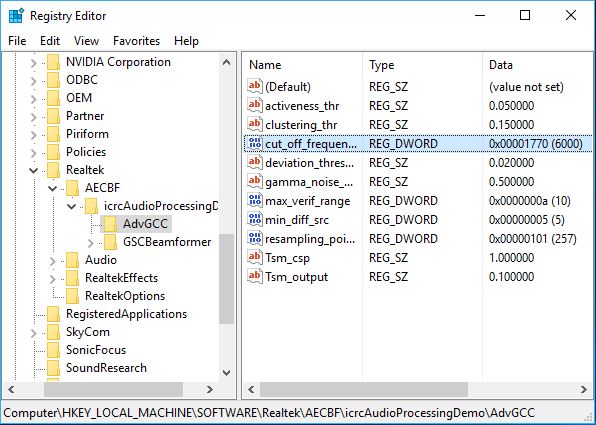
Next, we need to navigate to Realtek’s registry setting for the crossover frequency. If you look at the
left side of RegEdit, you’ll see a number of folders with an arrow next to it. This arrow expands the
folders and will show more folders, if applicable. Please use the arrows to navigate to this area:
Computer > HKEY_LOCAL_MACHINE > SOFTWARE > Realtek > AECBF > icrcAudioProcessingDemo
Click on AdvGCC, and you should see this menu, containing the “cut_off_frequency”
Right-Click on cut_off_frequency and select “Modify”
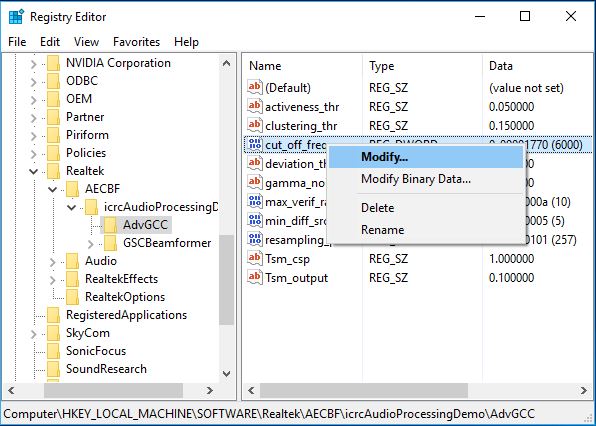
Make sure to select “Decimal”
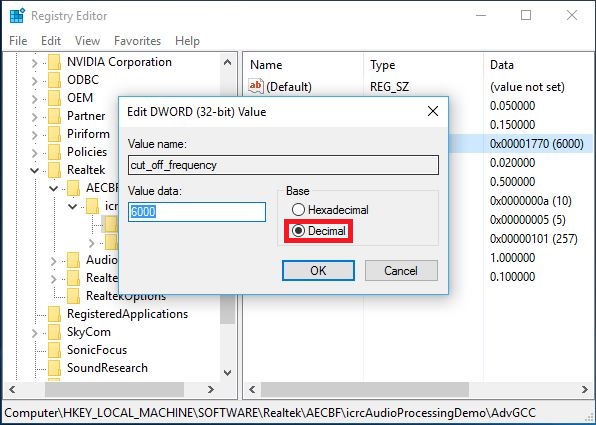
The crossover frequency may be listed at “6000”. This translates to 60Hz. If you want to set your
crossover frequency to 80Hz, for example, then set the Value data to 8000. Once you’ve entered the
value for your crossover frequency, click “Ok” to save, then close RegEdit.
Ideally, you’ll want to make sure that the crossover settings provide enough room to set the crossover
frequency a little higher than your speakers’ minimum frequency response, which will reduce distortion
and provide a smoother transition to your subwoofer. A good rule of thumb is to set the crossover
frequency about 20Hz higher than your minimum speaker frequency response. However, you may run into
three different scenarios:
First, the minimum frequency response of your speakers (e.g. 40Hz) and maximum frequency response of
your subwoofer (e.g. 80Hz) nicely overlap. This is ideal. Using the general rule above, you would
set the crossover frequency to 60Hz and call it a day. You should still test the audio to ensure it
is free of distortions, but this provides enough room to pass the low frequencies to the subwoofer and
keep the higher frequencies to the speakers, without creating a conflict.
Second, the maximum frequency response of your subwoofer (e.g. 60Hz) is exactly the same as the minimum
frequency response of your speakers (e.g. 60Hz). In this case, you must set the crossover frequency
exactly to where the subwoofer and speakers meet, which would be 60Hz in this example.
Third, you may have a situation where your speakers’ minimum frequency response (e.g. 100Hz) is higher
than your subwoofer’s maximum frequency response (e.g. 80Hz). This should only happen if you purchased
the subwoofer separately from the speakers. This setup cannot work properly, and you must replace
either the speakers or subwoofer for more compatible audio equipment. Although you can adjust the
setting to either the subwoofer’s maximum frequency response or your speakers’ minimum frequency response,
you’ll lose the audio data between those frequencies.
Ultimately, you will need to test the audio after making any changes. Due to drivers, the quality of your
audio equipment, and other software/hardware installed, you may need to test multiple crossover frequencies
if you experience audio problems, such as distortion. However, this process can be well worth the trouble
if it improves your audio.
** Disclaimer – This guide is for advanced users that are comfortable with using Windows Registry Edit and
may be performed at the user’s own risk. Changing Windows registry settings has the potential to damage
your core Windows processes and may prevent Windows from booting, or potentially create other software errors.
Although this guide is safe to use for the purpose stated above, EVGA is not responsible for any damage to
your PC, your copy of Windows, or any time and effort required to “fix” software errors that may occur as a
result of changing Windows registry entries, nor will EVGA Customer Support assist with correcting any errors
that may occur as a result of changing Windows registry entries.
Additional Resources:
To enable or disable Full-Range mode for Realtek or Creative audio,
please see our FAQ here:
59673
If you have questions about Full-Range speakers and whether you should set your speakers to Full-Range,
please see our FAQ here:
59672