NU Audio Pro SW Guide
Software Installation
Thank you for purchasing the EVGA NU Audio Pro Card! This guide will walk you through where to find software for your audio card, how to install the software, and a basic walkthrough of the NU Audio software and features. Please keep in mind that over time the software may change.
Where can I find software for my NU Audio card?
NU Audio software may be located on our Download Center at: https://www.evga.com/support/download/
Once there, select Other Products, select NU Audio Pro from the Category dropdown, select your NU Audio Pro Card from the Part Number dropdown, select All from the Type dropdown, and click Submit. Locate the most recent software available and download the software.
How Do I Install the Software?
Double-click the file you downloaded and you will be prompted to select an install location. After selecting the location, the software will install and notify you when the installation is complete. You may choose to run the NU Audio software at this time.
EVGA NU Audio Pro Software
The NU Audio software offers you control over the volume, input/output ports, EQ options, RGB LED lighting, and some basic settings.
Main Audio Page
Basic controls and features
1
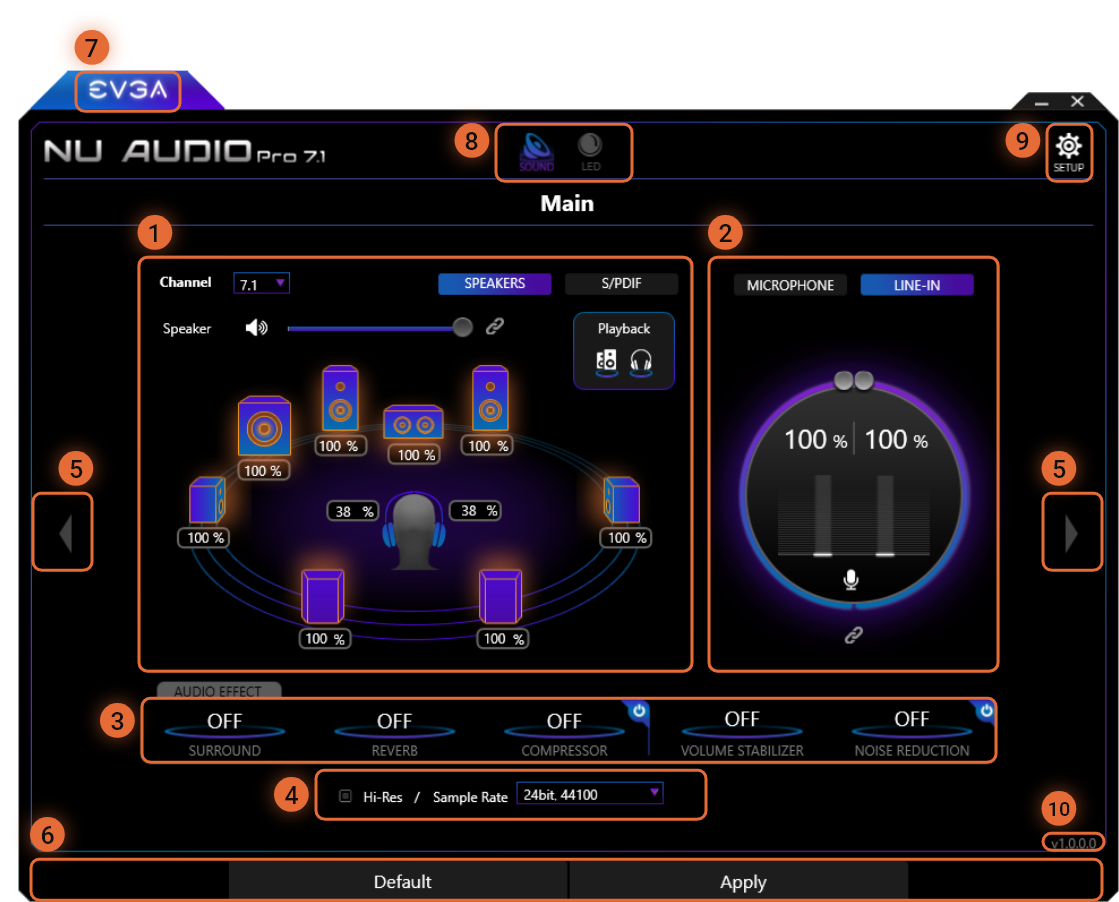
The Output section allows you to control your output connections, allows you to change the number of channels selected and configured within Windows, and adjust the volume for each of your output connections.
2
The Input section allows you to select and control your recording devices and the volume for each.
3
The Audio Effect panel contains the Nahimic software options that can be enabled/disabled individually, configured, or enabled/disabled as a group. See the Nahimic section below for more details.
4
The Sample rate box allows you to change the sample rate and bit-depth simultaneously for both the NU Audio Pro driver and Windows. The NU Audio Pro cards have different maximum usable sample rates depending upon the Channel Mode, Output and/or the Recording Device Selected:
- 2 Channel Mode*: Up to 32bit, 384kHz
- 7.1/5.1/4 Channel Mode**: Up to 32bit, 192kHz
- S/PDIF***: Up to 24bit, 192kHz
- Mic-In***: Up to 24bit, 192kHz
- Line-In*: Up to 32bit, 384kHz
Hi-Res Mode must be enabled in order to use a Bit-Depth and Sample Rate higher than 32-bit, 192kHz. When Hi-Res Mode is enabled, the NU Audio Pro card is limited to either 2 Channel Mode or S/PDIF, and analog surround options will be disabled. To enable Hi-Res Mode check the box next to Hi-Res, click OK to continue, and the software will restart. To disable Hi-Res Mode check the box next to Hi-Res, click OK to continue, and the software will restart and analog surround options will be restored.
*2 Channel Mode and Line-In may be selected when Hi-Res Mode is enabled or disabled, but can only be used above 32bit, 192kHz when in Hi-Res Mode.
**7.1/5.1/4 Channel Mode is only available when Hi-Res Mode is disabled.
***S/PDIF and Mic-In may be used when Hi-Res Mode is enabled or disabled. If Hi-Res Mode is enabled, you may be able to select a Bit-Depth and Sample Rate higher than 24bit, 192kHz, but the NU Audio Software will internally limit the sample rate to 24bit, 192kHz to prevent loss of performance.
- Please note that although the NU Audio Pro Cards are rated to work at high Bit-Depth and Sample Rates, applications may not be. Media, including YouTube videos, games, and other applications may fail to start or work properly when you have a high Bit-Depth and/or Sample Rate selected. If so, try to lower the Bit-Depth and Sample Rate to 16-bit, 44,100Hz and restart the application or video/track you want to play.
5
Arrow tabs will switch between the Main screen and the Quick and Advanced EQ options.
6
The Default tab will immediately reset all settings to the default settings, as if you just installed the driver. The Apply button is not used in this UI, as all setting changes take effect immediately.
7
The EVGA button at the top will take you immediately to the EVGA.com website.
8
The Sound/LED buttons at the top allow you to quickly switch between the Main menu and the LED control menu.
9
The Setup button will take you to the Setup Menu, where you can adjust startup settings and additional ASIO/digital filter settings.
10
The current software version can be located at the bottom right of the NU Audio Software page.
Output Menu
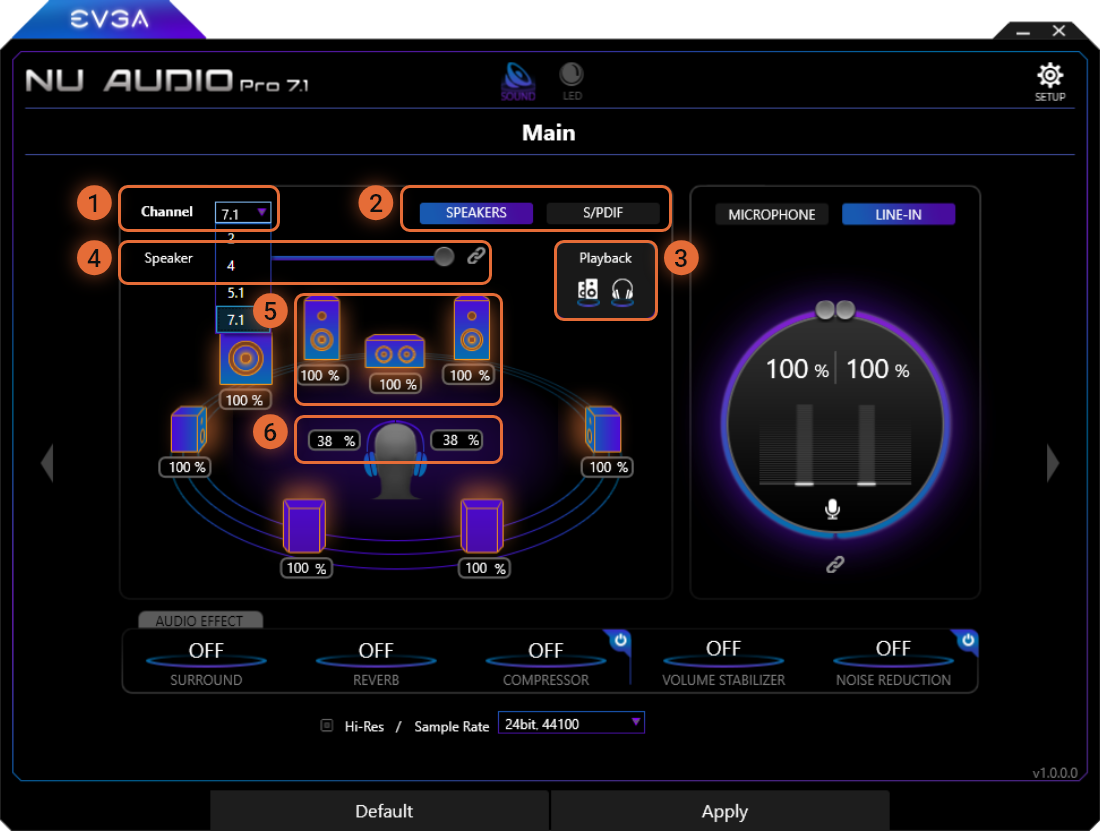
The Output Menu allows you to select between audio channels, Speakers and S/PDIF, enable/disable speaker or headphone playback, and adjust your speaker and/or headphone volume.
1
The Channel Select allows you to select between 7.1 Channel, 5.1 Channel, 4 Channel (or Quadraphonic), and 2 Channel audio. Selecting this will change the speaker configuration in Windows. The number of speakers available to adjust volume will depend upon the number of channels selected. We recommend to select 2 Channel Mode when using headphones; otherwise, some of the audio channels may not be properly passed to the headphones.
2
The Speakers and S/PDIF toggle menu will switch between the Speaker Output menu and the S/PDIF Output menu.
3
The Playback box allows you to enable and/or disable Speaker and Headphone audio playback. When both are enabled (highlighted in white), audio can playback through both speakers and headphones at the same time. If desired, disable either of the Speaker and Headphones to playback audio through your preferred audio playback device.
* Note – When the Speakers icon is enabled, you will hear a “click” coming from the NU Audio Pro Card whenever you turn your system on, restart your system, install the NU Audio Pro drivers, or enable/disable the Speakers icon. This is completely normal and expected, and occurs on all high-end audio cards. If you only use headphones or S/PDIF, you may disable the Speakers icon to mute the click. However, there is no harm or damage to the card by leaving the Speakers icon enabled at all times.
4
The Speaker box allows you to adjust the Windows Volume across all speaker outputs. Unlinking the Speaker box allows you to independently adjust the speakers to balance volume, or L/R headphone channels. When you raise the volume slider through Windows, this slider will increase and decrease.
5
When the Speaker box is unlinked, you can adjust each highlighted speaker to adjust the volume percentage to balance the listening distance and volume level for each of your speakers. Change the value by selecting the correct speaker and move the volume slider to your desired level.
6
The Headphone box behaves similarly to the Speaker box. You can adjust the volume percentage for the L/R playback separately or simply set the volume for both.
7.1 Channel Speaker Mode
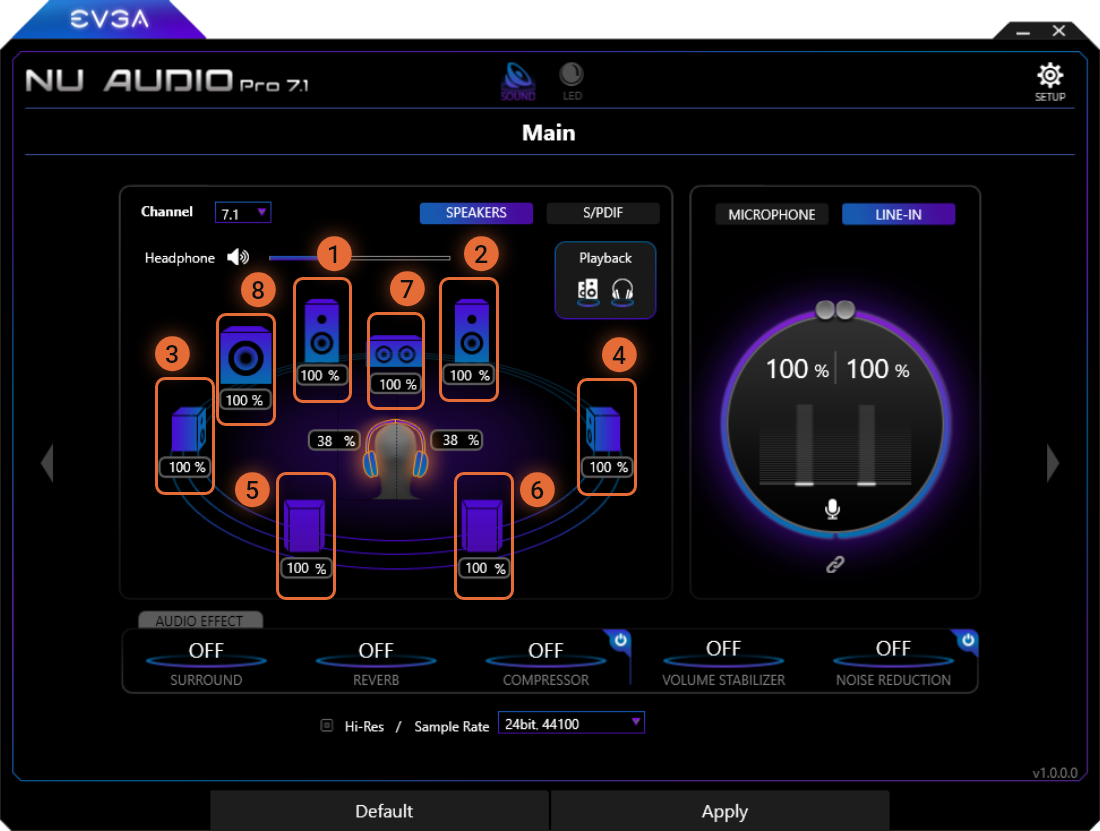
When set to 7.1 Channel, the following speakers will be available to be balanced:
1
Front-Left Speaker
2
Front-Right Speaker
3
Left Speaker
4
Right Speaker
5
Back-Left Speaker
6
Back-Right Speaker
7
Center Speaker
8
Subwoofer
5.1 Channel Speaker Mode
When set to 5.1 Channel, the following speakers will be available to be balanced:
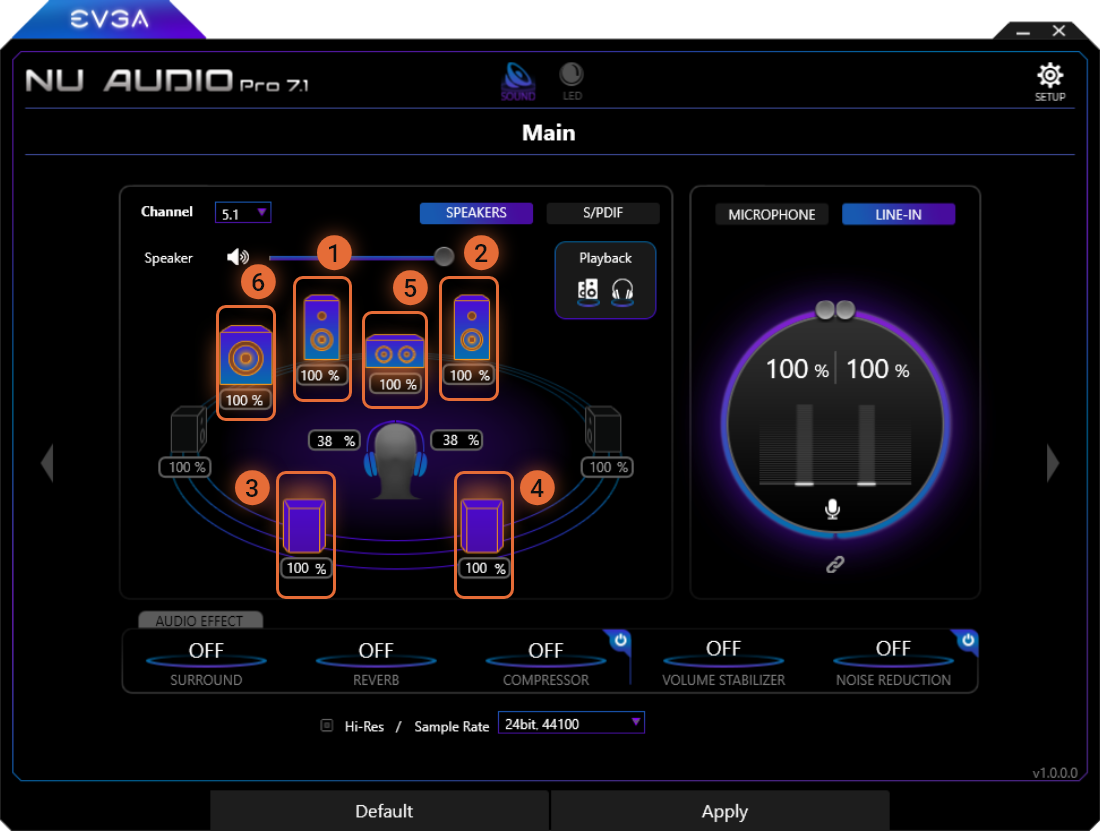
1
Front-Left Speaker
2
Front-Right Speaker
3
Rear-Left Speaker
4
Rear-Right Speaker
5
Center Speaker
6
Subwoofer
4 Channel Speaker Mode
When set to 4 Channel, the following speakers will be available to be balanced:
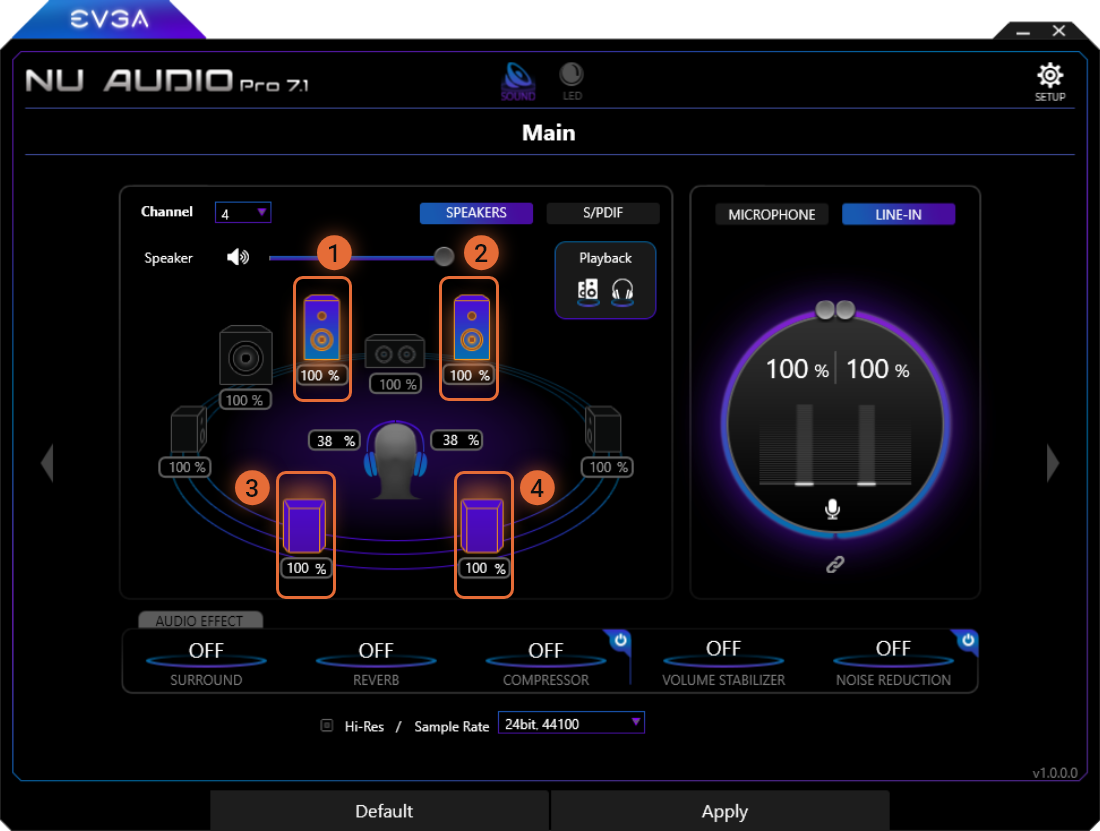
1
Front-Left Speaker
2
Front-Right Speaker
3
Rear-Left Speaker
4
Rear-Right Speaker
2 Channel Speaker Mode
When set to 2 Channel, the following speakers will be available to be balanced:
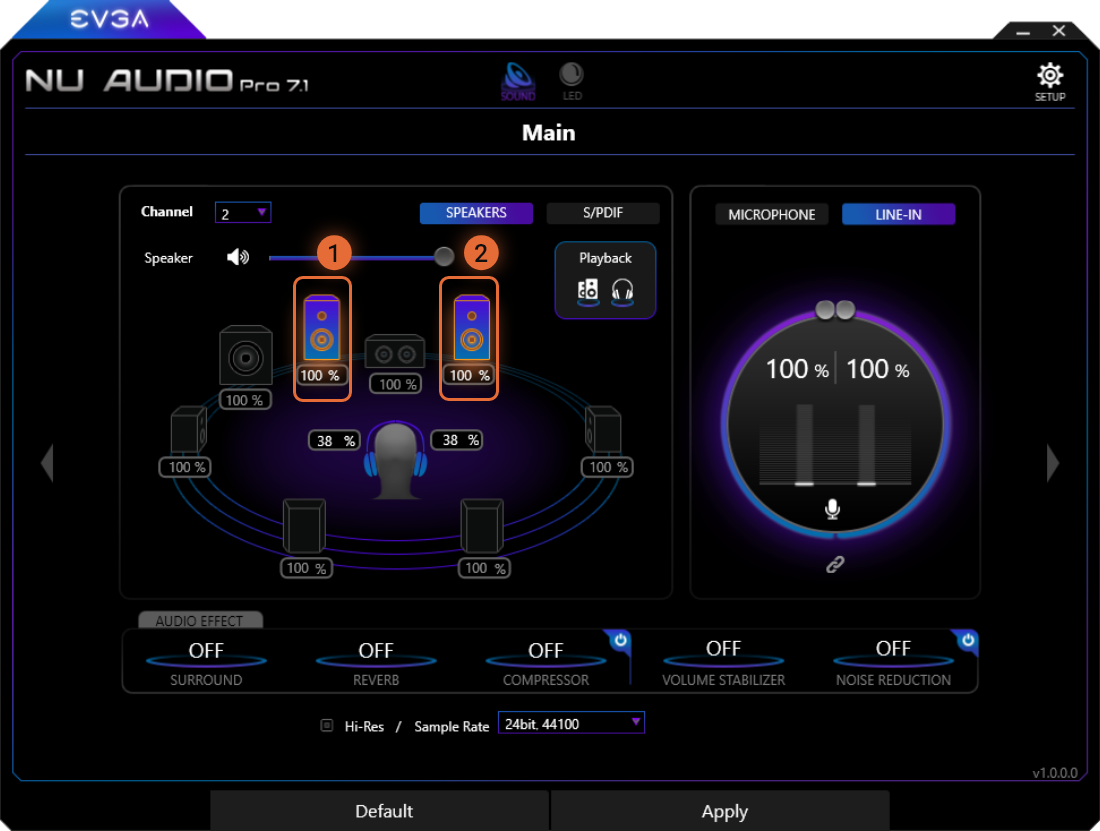
1
Front-Left Speaker
2
Front-Right Speaker
Headphone Mode
Due to the independent headphone amplifier, the Headphones can be configured separately from the Windows volume. For this reason, we offer a longer explanation below about how to configure your headphone volume properly to avoid damage to your hearing and your headphones.
First, though, you’ll notice that you can adjust the Headphone volume when you click on either of the headphone volume options (L/R), or by clicking again on the speaker to adjust the Windows volume.
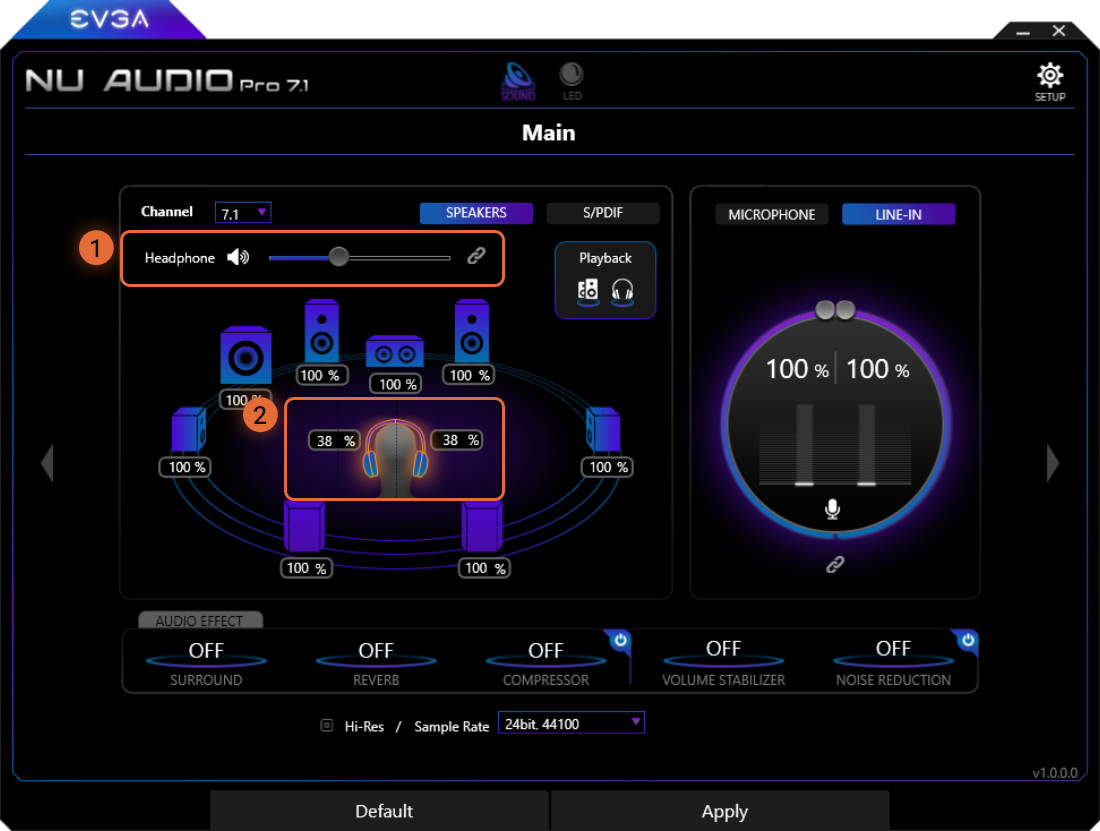
1
The Speaker Box will behave similarly to the way it does with Speakers. When raising and lowering the volume through Windows, the Speaker slider will increase and decrease.
2
The volume control for headphones – These volume boxes can be linked or unlinked to independently control the volume through the analog headphone amp. Although the Speaker box controls the output level for the system (i.e. volume in OS), the Volume Control for Headphones increases and decreases the power to the headphone amp. Volume can be changed by moving the slider bar to your desired value.
The headphone volume control replaces a headphone gain selector. However, it would not be accurate to directly compare the Headphone Volume Control to the min. and max. supported Ohm ratings for the NU Audio Pro Card (i.e. 16ohms-600ohms). For example, audio content is not always recorded at the same volume as other audio, and headphones have different sensitivity to voltage increases.
For best practices, we suggest to set the Master Volume to 100%, or close to it, and initially set the Headphone volume at 10-15%. In-ear monitors may need to be set even lower, due to low impedance. After setting the Headphone Volume, play some audio to make sure that you can hear audio, and put your headphones on only if the audio is low or at a comfortable level. Continue listening and slowly raise the Headphone Volume until the audio is at your optimal listening volume. Please be careful when setting the Headphone Volume; setting the Headphone Volume too high for an extended period of time can damage headphones rated for a lower impedance. Always lower the Headphone Volume when trying a different pair of headphones.
S/PDIF Mode
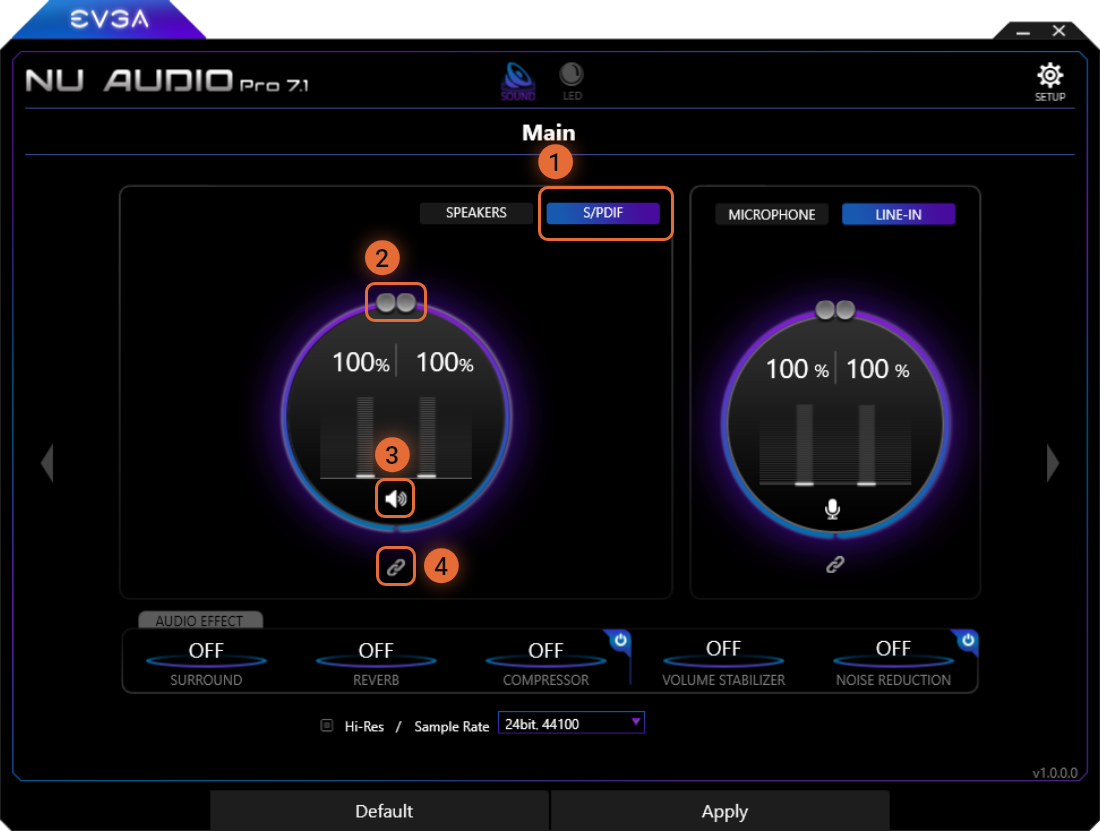
The S/PDIF menu must be enabled by clicking the S/PDIF toggle button to switch the menu, which will also have the effect of switching output devices in Windows. S/PDIF output is mutually exclusive to other output types, such as Speakers and Headphones.
1
The S/PDIF Toggle Switch allows you to switch between Speaker options (Line-Out and Headphones) and S/PDIF. While S/PDIF is enabled, you cannot output audio through speakers connected to the Line-Out ports or headphones, or vice-versa.
2
The volume controls allow you to raise and lower the volume. To independently control the volume levels between the left and right channels, you must first unlink the volume sliders and then adjust each slider accordingly.
3
The speaker button acts as a mute/unmute button. When muted, there will be an “x” next to the speaker.
4
This button links and unlinks the left and right S/PDIF channels for independent control.
Note – EVGA NU Audio Pro Cards feature passthrough support for Dolby Digital and DTS. This means that the card will not encode or decode Dolby Digital or DTS content. However, if your source (such as a movie) contains Dolby Digital or DTS, then the encoded signal will be passed to your receiver to decode the Dolby Digital/DTS signal and process the signal to your speakers.
Note 2 – The S/PDIF port has more limited rates of sample rate/bit-depth support. The S/PDIF port supports up to 24bit, 192,000Hz, but your S/PDIF device may not be rated that high. For example, many soundbars that accept an S/PDIF signal will not support higher than 96,000Hz. Please review your hardware specs and set the sample rate/bit-depth accordingly.
Input Menu
The Input Menu allows you to switch between the Microphone and Line-In inputs, as well as configure different settings for each. The Input options can be configured independently from the selected Output option.
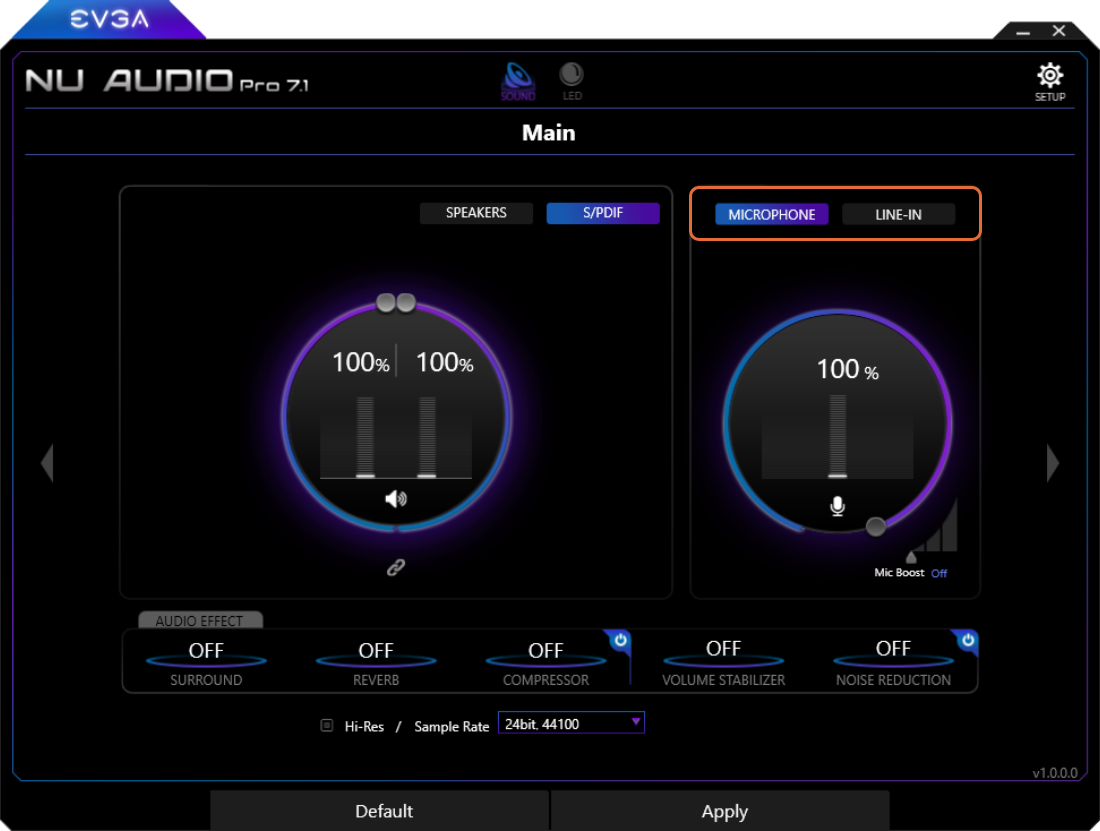
Use the toggle box to quickly switch between Microphone and Line-In. This will also change the default recording option in Windows.
Microphone Mode
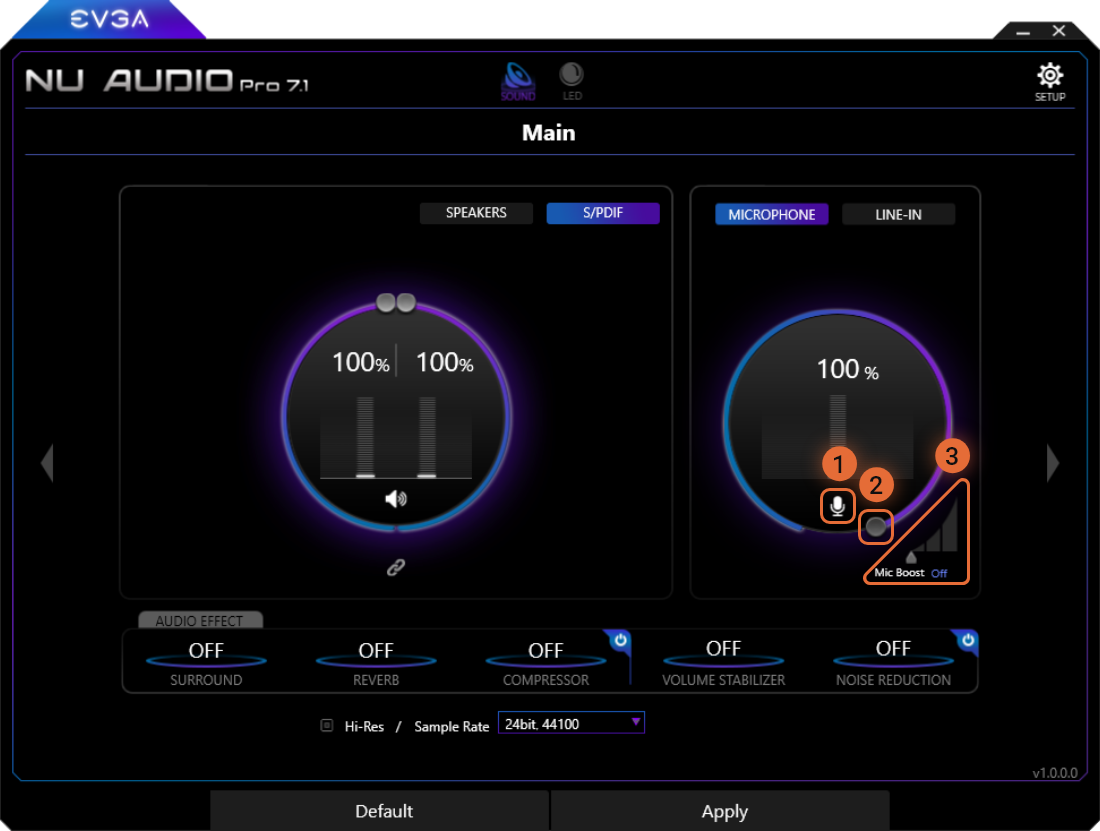
The Microphone option is enabled by default.
1
The mic button simply mutes or unmutes the microphone. When muted, the button will be crossed out.
2
The volume control raises and lowers the volume. The microphone volume is connected to the Windows recording volume and will increase and decrease accordingly.
3
The Mic Boost gives an additional gain to the microphone volume. Default is “Off”. Try increasing if you are having trouble being heard over a voice application.
Note – The Microphone In port is limited to a sample rate/bit-depth of 24-bit, 192,000Hz. Setting the sample rate higher than this value may cause issues, including no audio, artifacts, or volume issues.
Line-In Mode
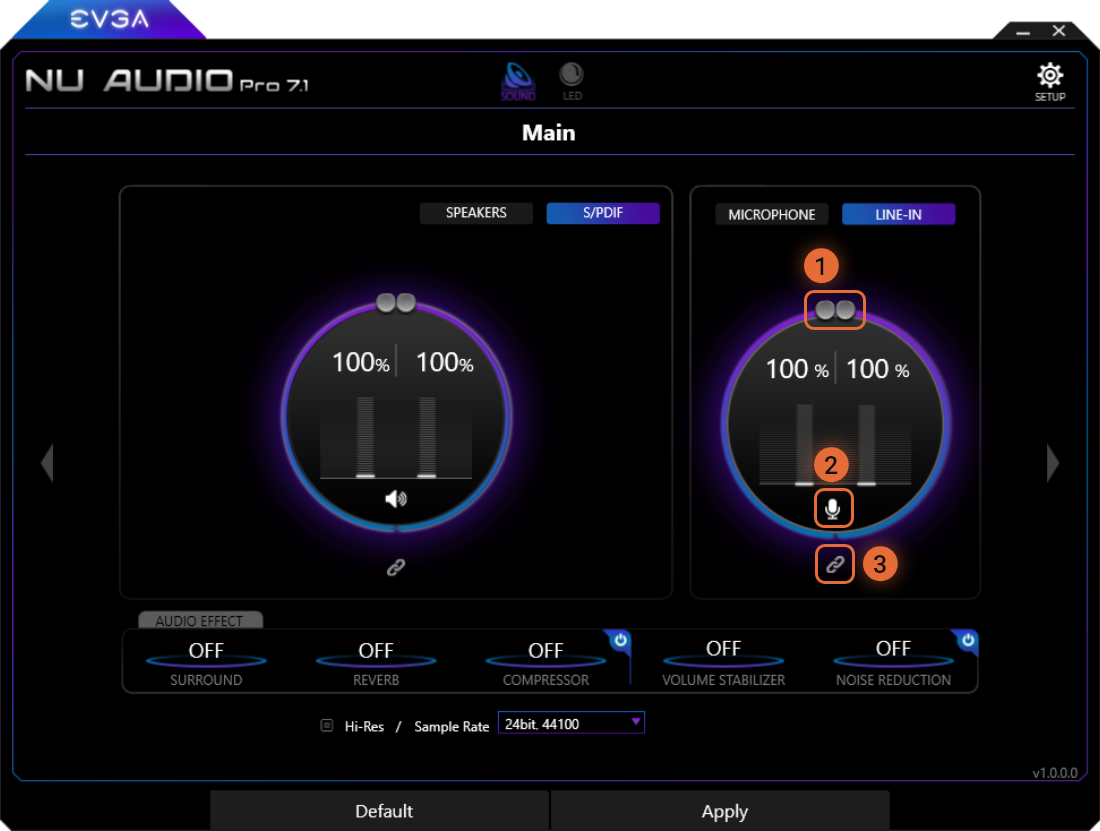
The Line-In option features the higher capable sample rate/bit-depth and the option to control the channel volume when recording
1
The volume controls allow you to raise and lower the recording volume. To independently control the volume levels between the left and right channels, you must first unlink the volume sliders and then adjust each slider accordingly. These volume sliders are connected to the Windows recording volume and will increase or decrease accordingly.
2
The mic button acts as a mute/unmute button. When muted, the button will be crossed out.
3
This button links and unlinks the left and right Line-In channels for independent control.
Nahimic Features
The Nahimic features allow for even more utility from the NU Audio Pro Cards. The features provide various software controls for output and input. These features are not enabled by default, and do not provide active DSP while the power buttons are enabled, unless you have also turned on any of the settings.
Nahimic Audio Effect - Output
The Nahimic Output settings feature the Nahimic 3D Audio for Gamers, reverb effects and a volume compressor. These can be used for speakers, headphones, or S/PDIF.

1
The Power button enables/disables the Input effects as a group. This does not turn on or off individual settings, but rather enables/disables these settings without changing your configuration.
2
The Volume Stabilizer helps to balance audio volume from loud to quiet moments during recordings. Use this if your listeners are having difficulty maintaining a steady volume due to volume spikes and dips from your recordings.
3
The Noise Reduction reduces ambient noise from your recordings. It removes constant, ever-present noises that may be located in your recording area, such as a fan.
4
The Compressor acts as a “smart volume” option and helps to balance your audio to prevent wide variations in audio.
Nahimic Audio Effect – Input
The Nahimic Input settings can be used on either the Microphone and Line-In options. These help to reduce volume variation and to help reduce ambient noise when recording.

1
The Power button enables/disables the Input effects as a group. This does not turn on or off individual settings, but rather enables/disables these settings without changing your configuration.
2
The Volume Stabilizer helps to balance audio volume from loud to quiet moments during recordings. Use this if your listeners are having difficulty maintaining a steady volume due to volume spikes and dips from your recordings.
3
The Noise Reduction reduces ambient noise from your recordings. It removes constant, ever-present noises that may be located in your recording area, such as a fan.
Equalization Options
What is EQ and Do I need it?
EQ, or Equalization, is a means to subjectively improve the sound quality by adjusting the balance between frequencies. In most cases, high-end speakers and headphones need very little, if any, EQ to sound great with a wide variety of audio. However, EQ can help to improve audio quality for a wide variety of speakers and headphones, or even a type of content that just doesn’t quite sound right. Only you can decide if your Audio needs EQ based on a combination of your speakers/headphones, the type of content you listen to, and your ability to hear the difference after moving the sliders.
Quick EQ Menu
The EVGA NU Audio Pro Card features two different types of EQ – a Quick Software-based EQ that will allow for quick adjustments to bass, vocal clarity, and treble, and a full 10-band Advanced to tailor audio exactly to your liking. The Advanced EQ menu will be covered in more detail below.
The Quick EQ menu is perfect to make quick adjustments while you’re playing a game, watching or listening to content that may not be from a quality source, and plenty of other situations where you find that you just need a little more bass or a little more detail. This is very effective when using the virtual surround function for gaming or movies.
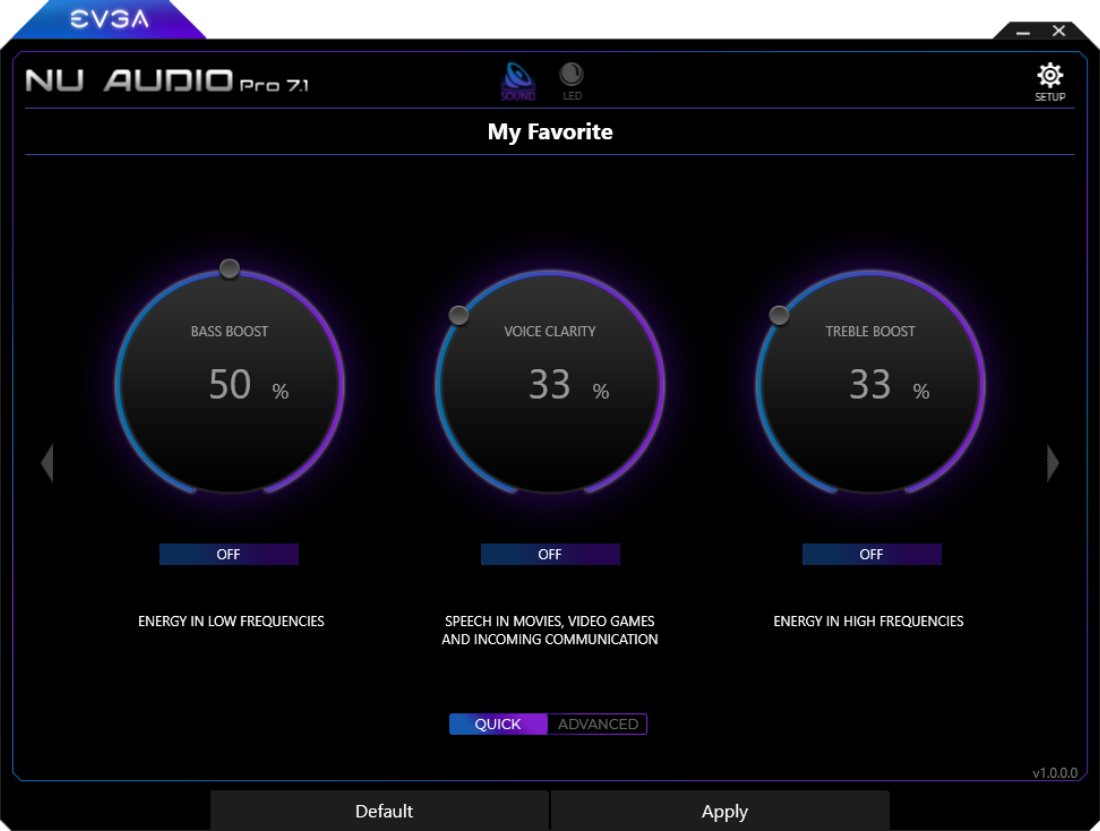
To access the Quick EQ menu, use one of the arrows on the side of the software and click on the “Quick” button. Enable any or all of the options and adjust the sliders to your preferences.
Advanced EQ Menu
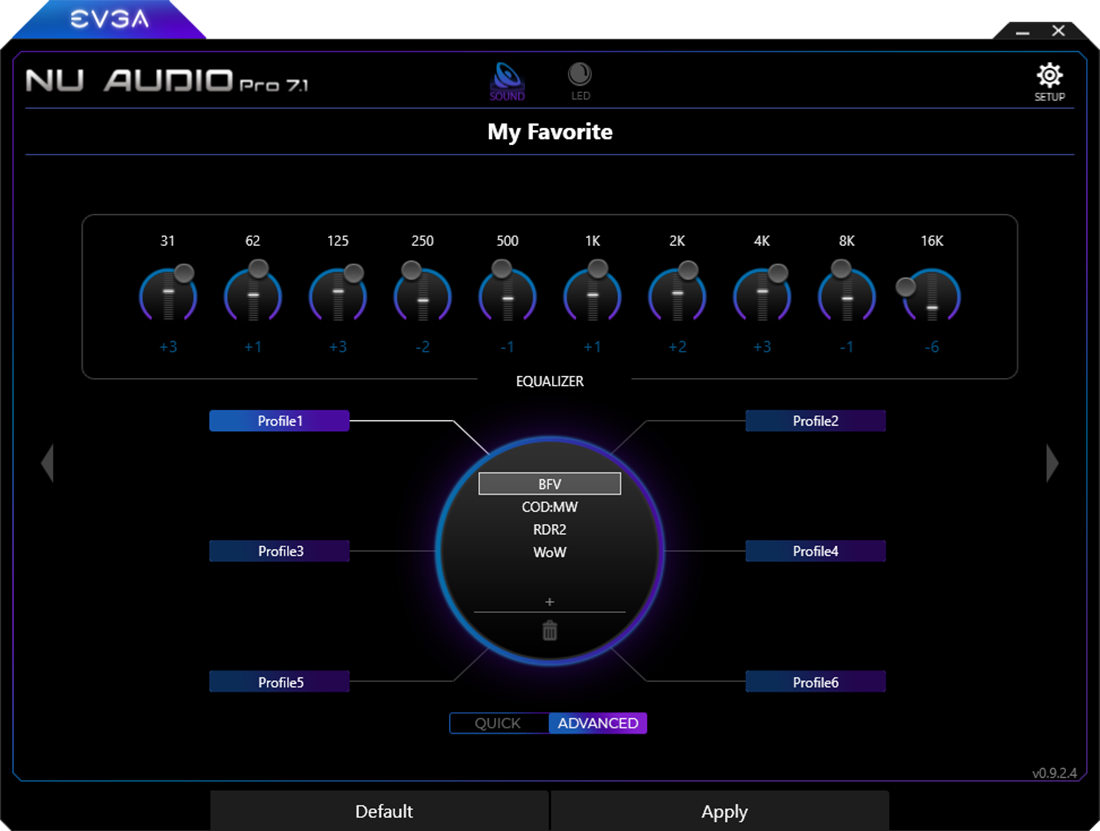
The EVGA NU Audio Pro Card software features a customizable EQ menu, which allows for up to 30 profiles. Each profile allows you to label on of the size categories to sort your EQ profiles in any way, and five profiles in each category, which may be named and customized. Simply click on one of the Custom Categories, and click on the “+” sign. Type in the name of the Profiles and click apply. These profiles do not feature preset EQ out of the box, so you will have to configure each profile yourself.
What are all those sliders for?
EQ Sliders represent a specific audio frequency, and raising or lowering each slider will have an effect by increasing or decreasing the loudness (in dB) of that particular frequency. Starting at the sub-bass frequencies of 32Hz to the upper bass at 250Hz, the lower midrange at 500Hz to the midrange at 2kHz and upper midrange at 4kHz, and finally up to the many treble ranges beginning around 8kHz to 16kHz, you generally want to focus on modifying the sliders between the 64Hz to 4kHz frequency range, which is where most people are able to hear the majority of audio frequency. However, some people are very sensitive to frequencies above the 8kHz range, and adjusting these frequencies can both improve the audio and make it less fatiguing. It’s recommended to test by adjusting a frequency’s loudness by 1-2dB at a time. You may notice that decreasing some frequencies may have the effect of making your audio quieter; you can turn the volume up to compensate. There are many guides available online to learn more about how to properly EQ many different types of audio, as well as to learn more about the EQ process itself.
RGB LED Lighting
The EVGA NU Audio Card features 10-Mode RGB lighting, including Audio Reactive Lighting. All lighting controls are available within the NU Audio software.
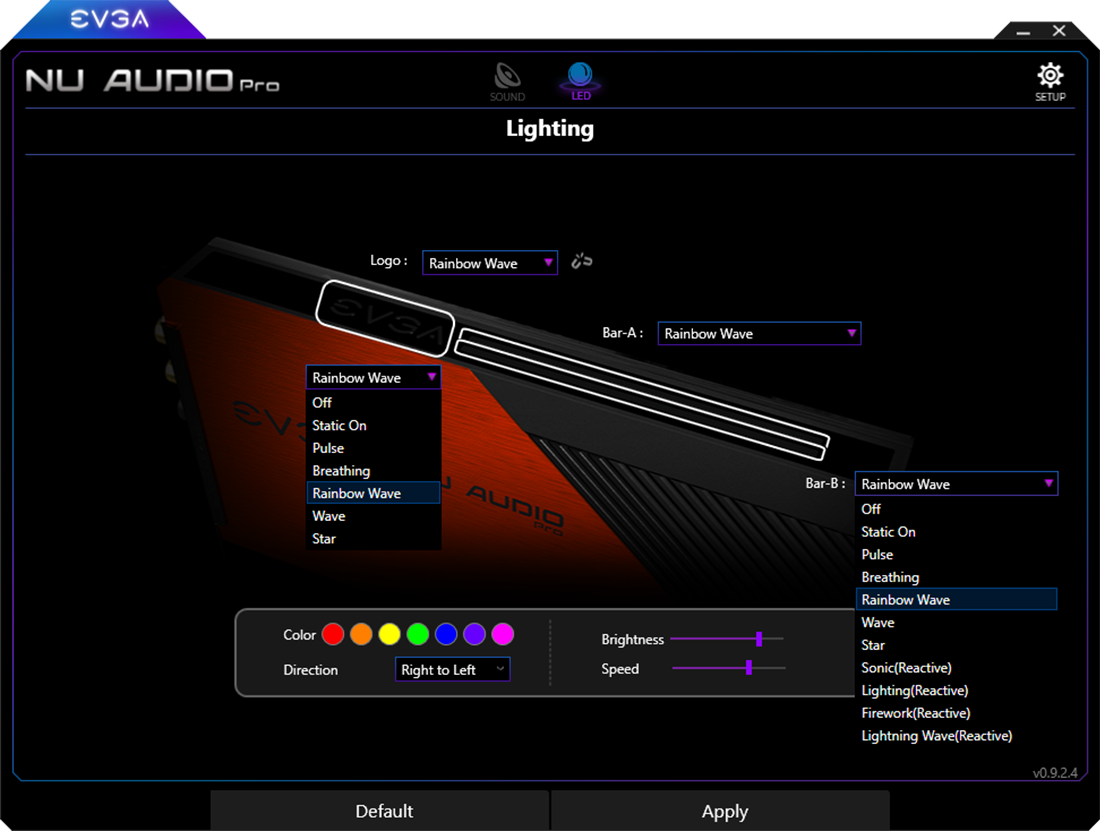
The RGB Lighting is controlled over three zones – Logo, Bar-A, and Bar-B. The Logo section covers the EVGA letters and can be linked to Bar-A and Bar-B to give the NU Audio Pro a uniform look for the RGB lighting. The Logo is capable of running each of the RGB options below, except for the Audio Reactive options.
If the zones are unlinked, each of the zones can be controlled separately. Unlinking the zones will give you the option to set either or both of the Bar options to an Audio Reactive lighting option to complement your audio selection.
The lighting may always be turned off at any time by selecting “Static Off”. For the rest, here’s a description of each:
- - Static On : Single color, basic lighting. Select the color you want and it will stay on without any additional effect.
- - Pulse : Single color. The lighting fades in and out. The fading speed can be controlled for both directions.
- - Breathing : Two colors. The lighting behaves as if breathing in and out, and changes colors as it does. The speed can be controlled in both directions.
- - Rainbow : Multiple colors. Rainbow effect cycles between many colors. Brightness, speed and direction may be controlled.
- - Wave : Single color that makes its way from one side of the lighting plate to the other. You may control the origin of the lighting and its speed.
- - Mist : Single color that slowly fades in from multiple points until solid and then fades out again.
- - Sonic (Reactive) : Shows a peak reactive to the audio content, based on selected Frequency (Master, Bass, Midrange, or Treble).
- - Lightning (Reactive) : Shows a pulse reactive to the audio content, based on selected Frequency (Master, Bass, Midrange, or Treble).
- - Fireworks (Reactive) : Shows a pulse in random LED reactive to the audio content.
- - Lightning Wave (Reactive) : Shows a light reactive to the volume of each Frequency (Master, Bass, Midrange, or Treble).

Audio Reactive Lighting. The remaining lighting options are controlled mostly by your audio content. Only Bar-A and Bar-B are capable of producing lighting in this fashion. Note that if audio is not playing, the bars will not light up.
Setup Menu
The Setup Menu contains the option to select your preferred language and configure the startup behavior here, and check the firmware version. After the initial installation, the NU Audio Software will pop-up in the middle of the screen. Navigate here to change whether the software starts up minimized or continues to pop-up in the middle of the screen.
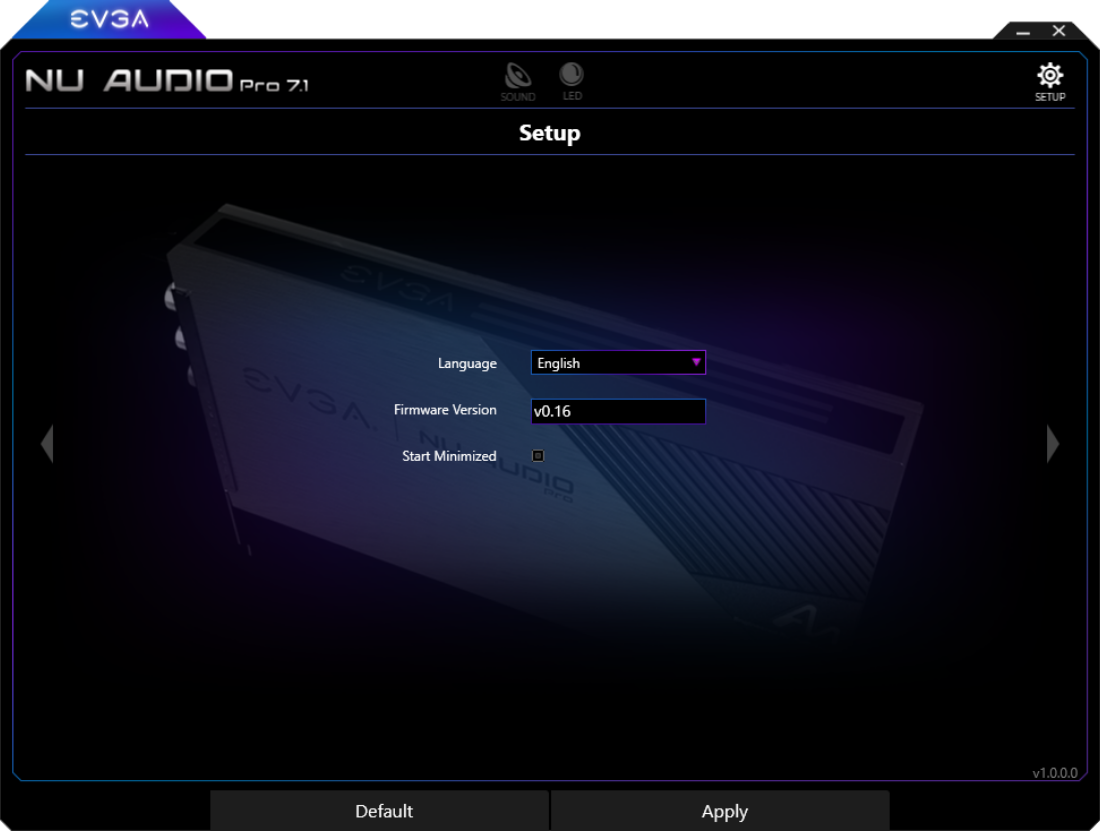
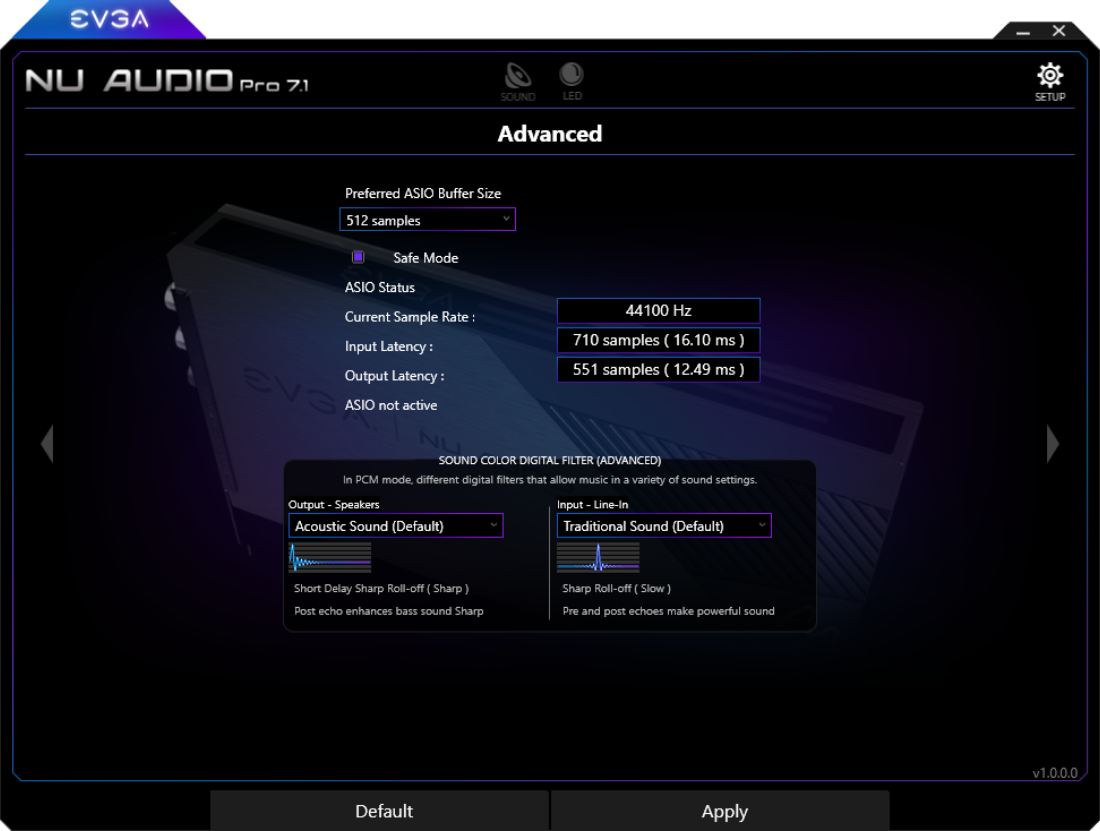
If you click the arrow on either side of the software, you will see a menu for the ASIO buffer settings and digital filters.
